Install!
How do I unpack and set up a GTCO Rollup III USB digitizer?Unpacking the GTCO Rollup III Digitizer
The GTCO Rollup III digitizer ships in a heavy cardboard tube. To open the digitizer tube, cut the tape and remove the lid. Inside you'll see the accessory box, a padded cardboard spacer, and the digitizer itself wrapped around the inside wall of the tube. |
|
To unpack the digitizer:
Orienting the GTCO Rollup digitizer
It's best to place the digitizer so the electronic bars on the right. Although these digitizers are reversible, with electronics on the right, the wires for the stylus and USB cable will come out of the top of electronics bar and be away from accidental damage. If you want to put the digitizer electronics on the left, make sure to click the right-angle button in the Superset menu once the digitizer is powered on.
Setting up the GTCO Rollup digitizer
Next we will , unpack the accessories box. To do that will open the lid, and then remove the installation CD, the manual, the digitizer stylus or cursor, and finally the USB cable.
Now the accessory box is empty, place it back in the padded cardboard spacer and put the spacer back into the digitizer storage tube. Don't lose the shipping container. The every need to return the digitizer to the manufacturer for repair, you'll need this to in order to ship it safely.
Plugging the cables into the digitizer
Now let's plug in the digitizer USB cable and stylus or cursor. At the end of electronics bar you'll see four ports. The first two ports are only used if you're using a serial connection to the computer and are not normally used these days. The third port is for the digitizer stylus or cursor.
Pick up the end of the stylus or cursor cable and you'll notice that it's keyed like a telephone cable. With the key side down, plug it into the third port. Then plug the square end of the USB cable into the fourth port.
Your GTCO digitizer is now set up. You are now ready to install the digitizer driver from the installation CD or from a download from the GTCO website.
To learn how to install the digitizer driver, named Tabletworks, please see the article below entitled “GTCO Digitizers - Installing the Tabletworks driver”.
- Lift the accessories box out using the hole in the end of the box.
- Lift the padded cardboard spacer straight up.
- Once the spacer is removed, grasp the end of the electronics bar and rotate it a quarter turn to loosen the digitizer from a wall of the tube.
- Then grasping the electronics bar as well as the other two layers of the board, carefully lift the digitizer straight up and roll it out on a flat surface making sure that the entire digitizer is supported.
Orienting the GTCO Rollup digitizer
It's best to place the digitizer so the electronic bars on the right. Although these digitizers are reversible, with electronics on the right, the wires for the stylus and USB cable will come out of the top of electronics bar and be away from accidental damage. If you want to put the digitizer electronics on the left, make sure to click the right-angle button in the Superset menu once the digitizer is powered on.
Setting up the GTCO Rollup digitizer
Next we will , unpack the accessories box. To do that will open the lid, and then remove the installation CD, the manual, the digitizer stylus or cursor, and finally the USB cable.
Now the accessory box is empty, place it back in the padded cardboard spacer and put the spacer back into the digitizer storage tube. Don't lose the shipping container. The every need to return the digitizer to the manufacturer for repair, you'll need this to in order to ship it safely.
Plugging the cables into the digitizer
Now let's plug in the digitizer USB cable and stylus or cursor. At the end of electronics bar you'll see four ports. The first two ports are only used if you're using a serial connection to the computer and are not normally used these days. The third port is for the digitizer stylus or cursor.
Pick up the end of the stylus or cursor cable and you'll notice that it's keyed like a telephone cable. With the key side down, plug it into the third port. Then plug the square end of the USB cable into the fourth port.
Your GTCO digitizer is now set up. You are now ready to install the digitizer driver from the installation CD or from a download from the GTCO website.
To learn how to install the digitizer driver, named Tabletworks, please see the article below entitled “GTCO Digitizers - Installing the Tabletworks driver”.
Installing the Tabletworks Driver for your GTCO Digitizer
Today will be installing the GTCO digitizer driver. The driver is named Tabletworks.
We can install the Tabletworks driver either from the installation CD or by downloading it from the GTCO website. The Tabletworks installation CD ships with the GTCO digitizer. Tabletworks can also be downloaded from GTCO at www.gtcocalcomp.com. |
|
Installing Tabletworks from the Tabletworks CD
To install it from the Tabletworks installation CD:
Downloading the Tabletworks driver
If you don't have a Tabletworks installation disk or you'd like to download the newest version, you can easily download it from the GTCO website.
To download the Tabletworks driver:
Plugging in the GTCO Digitizer
Once the Tabletworks drivers installed, you can plug in the digitizer USB cable. Once the cable is plugged in the board will give a double beep as is powers on and the Tabletworks driver should automatically detect the digitizer.
Testing Tabletworks
You can check the operation of the digitizer by placing the stylus or cursor on the surface of the board moving around. As you move the stylus or cursor on the digitizer, the mouse pointer should match your movements on the screen. If it does not, restart your computer and test it again. If it still does not work, then see our troubleshooting section.
Configuring the Tabletworks driver
Next we'll need to open up the Tabletworks Control Panel and change some settings to make the operation of the digitizer more reliable.
To open the Tabletworks Control Panel, either find the Tabletworks icon in the system tray in the lower right corner of the screen or open the Tabletworks control panel from the Programs Menu.
Enabling Wintab
Once the Tabletworks Control Panel is open you'll see your digitizer listed in the upper portion of the Control Panel. You’ll see three checkboxes after the name of your digitizer. Make sure that both mouse and wintab boxes are checked. The Tabcon box should be left blank unless you are explicitly told to enable it by your software vendor. If you enable Tabcon, it will interfere with the Wintab portion of the driver.
Specifying a Cursor
Then down toward the center of the dialog box, click the “Specify a cursor” checkbox and then select either a stylus or a 16 button cursor from the pulldown list below.
Next click on either the “Stylus” tab or “16 Button Cursor” tab depending on whether you have a stylus or 16 button cursor. On that tab, change the Mouse Mode to “Relative”. If the mouse mode is left on “Absolute” and the digitizer stylus or cursor is left on the digitizer, it will automatically snap the mouse pointer to the corresponding position on the screen when you're working in non-wintab programs. That is very annoying.
Your Tabletworks is now ready to use.
To install it from the Tabletworks installation CD:
- Insert the CD into the disk drive on your computer. After a few moments the installation menu will appear.
- Click “Install Tabletworks” to start the Tabletworks installation.
- After a few moments the Tabletworks installer welcome screen will appear. Click the [Next] button.
- Then click [Yes] at the License Agreement Screen.
- For the “Installation Type”, leave it as “Complete” and click the [Next] button.
- The next screen informs you that you may see the add hardware Wizard after the installation is complete. This is very unusual in our experience. Click the [Next] button on the screen.
- If you are installing over an older version of Tabletworks, the Tabletworks installer will warn you. Please click the [Continue} button to continue the installation.
- The Tabletworks driver will then install.
- At the final screen, click [Finish].
- Then close out of the Tabletworks installation menu by clicking the exit button in the lower right-hand corner of the menu.
Downloading the Tabletworks driver
If you don't have a Tabletworks installation disk or you'd like to download the newest version, you can easily download it from the GTCO website.
To download the Tabletworks driver:
- Start your browser.
- In the address bar type www.GTCOCalcomp.com and press enter.
- At the GTCO website click “Support” on the silver menu near the top of the screen.
- Select “Tech Support” on the drop down menu.
- At the next screen click the “Drivers and software downloads” link. That will put you at the drivers and software download page.
- On the Drivers and Software Download page, the fourth column over is the download column.
- You can click on the first link in this column. As of the writing of this article the latest Tabletworks driver was TW–11.01.0.3. The Tabletworks drivers are updated every few months is a good idea to download the newest version.
- Download the Tabletworks driver, and save it somewhere on your hard drive.
- To start the Tabletworks installation, double-click the file you just downloaded and follow the Tabletworks installation instructions above starting with Step 3.
Plugging in the GTCO Digitizer
Once the Tabletworks drivers installed, you can plug in the digitizer USB cable. Once the cable is plugged in the board will give a double beep as is powers on and the Tabletworks driver should automatically detect the digitizer.
Testing Tabletworks
You can check the operation of the digitizer by placing the stylus or cursor on the surface of the board moving around. As you move the stylus or cursor on the digitizer, the mouse pointer should match your movements on the screen. If it does not, restart your computer and test it again. If it still does not work, then see our troubleshooting section.
Configuring the Tabletworks driver
Next we'll need to open up the Tabletworks Control Panel and change some settings to make the operation of the digitizer more reliable.
To open the Tabletworks Control Panel, either find the Tabletworks icon in the system tray in the lower right corner of the screen or open the Tabletworks control panel from the Programs Menu.
Enabling Wintab
Once the Tabletworks Control Panel is open you'll see your digitizer listed in the upper portion of the Control Panel. You’ll see three checkboxes after the name of your digitizer. Make sure that both mouse and wintab boxes are checked. The Tabcon box should be left blank unless you are explicitly told to enable it by your software vendor. If you enable Tabcon, it will interfere with the Wintab portion of the driver.
Specifying a Cursor
Then down toward the center of the dialog box, click the “Specify a cursor” checkbox and then select either a stylus or a 16 button cursor from the pulldown list below.
Next click on either the “Stylus” tab or “16 Button Cursor” tab depending on whether you have a stylus or 16 button cursor. On that tab, change the Mouse Mode to “Relative”. If the mouse mode is left on “Absolute” and the digitizer stylus or cursor is left on the digitizer, it will automatically snap the mouse pointer to the corresponding position on the screen when you're working in non-wintab programs. That is very annoying.
Your Tabletworks is now ready to use.
Note: If you don't know if your digitizer is a "serial digitizer" or not, see the topic below.
1. Before you attach the digitizer to the computer, install the digitizer driver software that came with the digitizer. If you don't have the disk or you want the newest version of the digitizer driver, then see the topic "How do I download a digitizer driver?"
2. Once the digitizer driver software is installed, examine the digitizer. A serial digitizer should only three cables attached to it. One should be a serial cable, one should be a power supply and the other should be the cable going to the stylus or cursor. Serial digitizers require a power supply and will not function without one. If you don't have a power supply, then call the manufacturer to purchase a replacement.
3. Once you have determined that the digitizer has the correct cabling, plug the end of the serial cable into an open serial port on the computer.
4. Configure the digitizer to be compatible with the digitizer driver. For GTCO digitizers, this requires that you use the "S01" setting on the SuperSet menu. If the need help using the SuperSet menu, see the "How to configure a GTCO serial digitizer for TabletWorks" on the Configure page.
5. Restart your computer.
6. Once the computer has restarted, test the digitizer by moving the cursor/stylus across the surface of the digitizer and watching the mouse pointer. If the mouse pointer moves, then your digitizer is installed correctly and you can stop here.
5. If your mouse pointer does NOT move with the digitizer stylus/cursor, then reboot the computer and try moving the digitizer stylus/cursor again. If the mouse pointer still does not move, then go to the "Fix" page and follow the instructions in "Hey, why isn't my digitizer working?"
How do I install the TabletWorks driver?
If you will be using a digitizer with your computer, you will first need to install the TabletWorks driver.
If you've recently purchased a digitizer you should install the TabletWorks driver from the CD that came with the digitizer.
If you do not have the original CD or if you have an older digitizer, you can download the driver from the GTCO support website. (www.gtcocalcomp.com/downloads)
Installing the TabletWorks driver is quite easy. Simply start the TabletWorks installer and follow the on-screen instructions.
How do I know if I have a serial or USB digitizer?
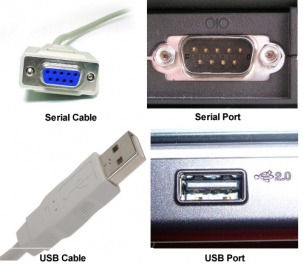
SERIAL: Older digitizers have serial connections. One end of the cable plugs into the digitizer and the other end plugs into a serial port on the computer. A serial cable is female at the computer end with nine holes in two rows of 5 and 4. A serial port on the back of the computer is male and has nine pins in two rows of 5 and 4.
Examples of serial digitizers are:
GTCO
Rollup and Rollup II
Super L, Super L+, Super L II and Super L III
CalComp
DrawingBoard III and iV
Summagraphics
All Summa digitizers
NOTE: If you have an adapter that allows your serial cable to plug into a USB port, it is still a serial digitizer.
USB: Newer digitizers have USB connections. One end of the cable plugs into the digitizer and the other plugs into a USB port on the computer.
Examples of USB digitizers
GTCO
Rollup III
Super L VI
CalComp
DrawingBoard V
How do I install a Serial-to-USB adapter?
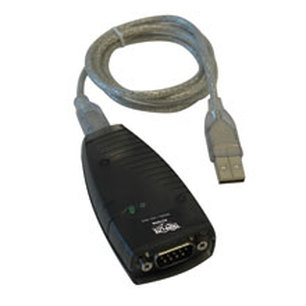
If your computer does not have a Serial port and if your digitizer does not have a USB port, then you will need to install a Serial-to-USB adapter.
A USB-to-Serial Port Adapter can be purchased at some computer stores and at many on-line retailers. The only brand of USB-to-Serial Port adapter recommended Dr. Digitizer and GTCO is the Keyspan USA-19HS. The Doctor recommends this adapter because it is the only adapter with usable configuration software. It is available from Amazon.
Installing the Keyspan USB-to-Serial Port Adapter
To install the adapter:
Checking the Keyspan USB-to-Serial Adapter
After installing the Keyspan adapter, you will need to check that the serial port assignment is between port #1 and port #8.
To check the Keyspan adapter's serial port assignment:
A USB-to-Serial Port Adapter can be purchased at some computer stores and at many on-line retailers. The only brand of USB-to-Serial Port adapter recommended Dr. Digitizer and GTCO is the Keyspan USA-19HS. The Doctor recommends this adapter because it is the only adapter with usable configuration software. It is available from Amazon.
Installing the Keyspan USB-to-Serial Port Adapter
To install the adapter:
- Place the Keyspan adapter CD in your computer’s CD drive and close the drive door.
- Once the Keyspan CD browser has started, click on the “Install Software” selection
- Then click on the “Install Keyspan USA19H Software” selection to install the Keyspan adapter driver.
- Once the software is installed, plug the Keyspan adapter into an open USB port either on the computer or on a powered USB hub. Windows will then detect the adapter and complete the installation.
Checking the Keyspan USB-to-Serial Adapter
After installing the Keyspan adapter, you will need to check that the serial port assignment is between port #1 and port #8.
To check the Keyspan adapter's serial port assignment:
- Open the Keyspan Serial Assistant program by going to “Start menu”, then “Programs”, then the “Keyspan USB Serial Adapter” entry and finally to the “Keyspan Serial Assistant”.
- After the Keyspan Serial Assistant opens, click on the “+” symbol next to the “USA-19H-1” entry.
- Then look at the comm port assigned to the adapter. If it falls within the range of 1 to 8, then the adapter is ready to be used.
- If the port assignment is above 8, then you will need to configure the adapter.